最近云服务器大减价,趁机买了几台,博客就放在其中一台上,为了不让剩下的两台服务器闲置,打算都利用起来,对博客网站进行负载均衡。使用两台数据库进行主主同步配置,扩展网站数据库架构,提高数据库的读写性能。
以下是MySQL主主同步配置实战过程。
首先说下什么是MySQL主主同步。
假设有两台服务器,这两台服务器上都安装了MySQL数据库软件,但是网站如果只使用单台服务器,性能会受到限制。为了扩展网站的容量,可以同时使用这两台数据库服务器,再搭配上负载均衡配置,让访客随机访问这两台数据库服务器,这样访问速度更快了,且不容易因为访客过多而导致服务器宕机。
一、软件版本和环境设置
两台数据库服务器:
Server 1:192.168.0.1
Server 2:192.168.0.2
两台数据库服务器MySQL版本一致,均为:
MySQL 5.7.29-log – Source distribution
两台服务器的数据库已经手动同步完毕
二、主主同步数据库配置
1.修改MySQL配置文件,开启同步:
在数据库server 1的my.cnf文件mysqld节点添加以下配置:
server-id = 1
log-bin=mysql-bin
binlog_format=mixed
auto_increment_increment=2
auto_increment_offset=1
replicate-ignore-db=mysql
replicate-ignore-db=information_schema
replicate-ignore-db=performance_schema
character_set_server=utf8
log-bin-trust-function-creators=1
在数据库server 2的my.cnf文件mysqld节点添加以下配置:
server-id = 2
log-bin=mysql-bin
binlog_format=mixed
auto_increment_increment=2
auto_increment_offset=2
replicate-ignore-db=mysql
replicate-ignore-db=information_schema
replicate-ignore-db=performance_schema
character_set_server=utf8
log-bin-trust-function-creators=1
注意:可能部分命令已经配置后了,这里只需要将没有配置的上述部分写如MySQL配置文件。
下面对刚才写的配置文件进行解析:
server-id 是服务器标号,可以为任意数字,但是两台服务器要求不能相同
log_bin 表示启动mysql二进制日志,如果没有配置这个将无法远程链接
binlog_format 为数据库复制模式
replicate-ignore-db 指定不同步的数据库,如果有多个数据库不需要同步可以多个分别声明
character_set_server=utf8 指定utf8为默认字符集
auto_increment_increment=2 为了避免两台数据库同步冲突,将数据库中自动增长键值的步进值auto_imcrement设置为2。一般有n台主MySQL就填n
auto_increment_offset 设定数据库中自动增长的起点,两台mysql的起点必须不同,这样才能避免两台服务器同步时出现主键冲突
log-bin-trust-function-creators=1 在默认情况下,mysql会阻止主从同步的数据库function的创建,这会导致我们在导入sql文件时如果有创建function或者使用function的语句将会报错。
2.重启数据库
修改数据库配置后分别重启:
/etc/inint.d/mysqld restart
3.进入MySQL进行同步授权
分别进入数据库:
mysql -uroot -p
然后分别进行同步授权:
server 1:
grant replication slave, replication client on *.* to 'root'@'192.168.0.2' identified by '数据库密码';
server 2:
grant replication slave, replication client on *.* to 'root'@'192.168.0.1' identified by '数据库密码';
之后分别刷新权限:
flush privileges;
4.查看两台数据库服务器的日志节点
为进行下一步配置,需要获得两台数据库服务器mysql-bin位置和Position值。
分别使用show master status;命令查看。
server 1:
mysql> show master status;
+------------------+----------+--------------+------------------+-------------------+
| File             | Position | Binlog_Do_DB | Binlog_Ignore_DB | Executed_Gtid_Set |
+------------------+----------+--------------+------------------+-------------------+
| mysql-bin.000011 |     8428 |              |                  |                   |
+------------------+----------+--------------+------------------+-------------------+
1 row in set (0.00 sec)
server 2:
mysql> show master status;
+------------------+----------+--------------+------------------+-------------------+
| File             | Position | Binlog_Do_DB | Binlog_Ignore_DB | Executed_Gtid_Set |
+------------------+----------+--------------+------------------+-------------------+
| mysql-bin.000005 |     5346 |              |                  |                   |
+------------------+----------+--------------+------------------+-------------------+
1 row in set (0.00 sec)
这样获得了mysql-bin的位置和Position值,下一步配置的时候需要用到。
5.分别设置日志同步节点
server 1:
mysql> change master to
    -> master_host='192.168.0.2',
    -> master_port=3306,
    -> master_user='root',
    -> master_password='数据库密码',
    -> master_log_file='mysql-bin.000005',
    -> master_log_pos=5346;
Query OK, 0 rows affected, 2 warnings (0.03 sec)
server 2:
mysql> change master to
    -> master_host='192.168.0.1',
    -> master_port=3306,
    -> master_user='root',
    -> master_password='数据库密码',
    -> master_log_file='mysql-bin.000011',
    -> master_log_pos=8428;
Query OK, 0 rows affected, 2 warnings (0.03 sec)
这里根据自己服务器的真实IP地址、数据库用户名、数据库端口、数据库密码进行设置,master_log_file和master_log_pos分别设置成在另外一台数据库服务器上查询得到的数据。
注意:每次“flush privileges”和“stop slave”后,或者数据库重启后,日志节点的内容会改变,所以如果不确定,每次执行此操作前必须要查看日志节点——show master status;。另外,执行此操作时slave必须没有启动,如果已经启动了,那就先停止,指令:stop slave;
6.启动同步
分别在两台数据库服务器上启动同步:
start slave;
这样数据库主主同步就成功了!
三、查看同步状态
启动同步后,可以查看数据库的同步状态。
查看同步状态的命令是:show slave status\G
server 2:
mysql> show slave status\G
*************************** 1. row ***************************
               Slave_IO_State: Waiting for master to send event
                  Master_Host: 192.168.0.1
                  Master_User: root
                  Master_Port: 3306
                Connect_Retry: 60
              Master_Log_File: mysql-bin.000011
          Read_Master_Log_Pos: 27366
               Relay_Log_File: iZ8vbamf5ysf8obxd0lheqZ-relay-bin.000002
                Relay_Log_Pos: 19258
        Relay_Master_Log_File: mysql-bin.000011
             Slave_IO_Running: Yes
            Slave_SQL_Running: Yes
              Replicate_Do_DB:
          Replicate_Ignore_DB: mysql,information_schema,performance_schema
           Replicate_Do_Table:
       Replicate_Ignore_Table:
      Replicate_Wild_Do_Table:
  Replicate_Wild_Ignore_Table:
                   Last_Errno: 0
                   Last_Error:
                 Skip_Counter: 0
          Exec_Master_Log_Pos: 27366
              Relay_Log_Space: 19483
              Until_Condition: None
               Until_Log_File:
                Until_Log_Pos: 0
           Master_SSL_Allowed: No
           Master_SSL_CA_File:
           Master_SSL_CA_Path:
              Master_SSL_Cert:
            Master_SSL_Cipher:
               Master_SSL_Key:
        Seconds_Behind_Master: 0
Master_SSL_Verify_Server_Cert: No
                Last_IO_Errno: 0
                Last_IO_Error:
               Last_SQL_Errno: 0
               Last_SQL_Error:
  Replicate_Ignore_Server_Ids:
             Master_Server_Id: 1
                  Master_UUID: 562716ca-8e01-11ea-9589-00163e04c0bd
             Master_Info_File: /www/server/data/master.info
                    SQL_Delay: 0
          SQL_Remaining_Delay: NULL
      Slave_SQL_Running_State: Slave has read all relay log; waiting for more updates
           Master_Retry_Count: 86400
                  Master_Bind:
      Last_IO_Error_Timestamp:
     Last_SQL_Error_Timestamp:
               Master_SSL_Crl:
           Master_SSL_Crlpath:
           Retrieved_Gtid_Set:
            Executed_Gtid_Set:
                Auto_Position: 0
         Replicate_Rewrite_DB:
                 Channel_Name:
           Master_TLS_Version:
1 row in set (0.00 sec)
可以看到数据库同步已经连接成功了!
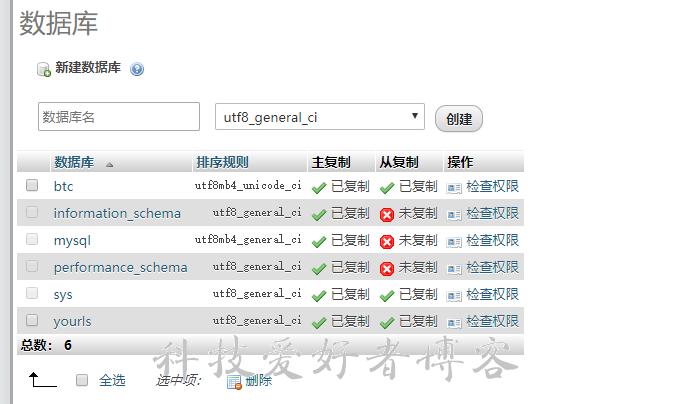
这时如果安装了phpmyadmin,可以看到显示数据库已经处于“主复制”和“从复制”状态了。

在一台数据库中进行修改,另外一台数据库也会执行同样的更改,可以验证MySQL主主同步配置成功!
四、常见错误
MySQL主主同步配置常见的错误信息如下:
Slave_IO_State: Connecting to master
或者显示:
Slave_IO_Running: Connecting
Slave_SQL_Running: Yes
这个错误表明连接另一台数据库服务器不成功,可能的原因有网络不通、数据库账号密码错误、pos错误或者数据库端口未开放,其中,数据库端口未开放最常见。
我使用的是宝塔面板,第一次配置后出现了这个错误,最后发现是宝塔面板没有对数据库的3306端口放行导致的,放开3306端口后错误解决。

