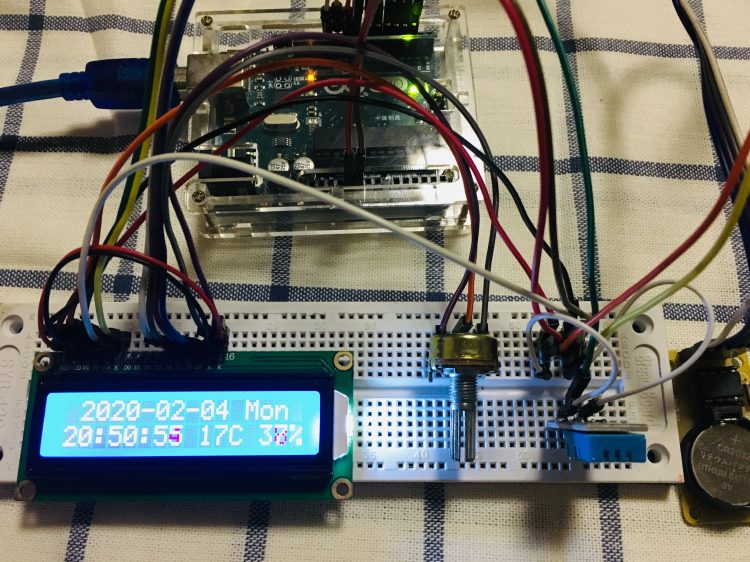
在Arduino使用DS1302读取时间、Arduino使用LCD1602液晶显示屏和Arduino上使用DHT11传感器测量温度和湿度这三篇文章中,学习了DHT11、DS1302、LCD1602这三个传感器在Arduino上的使用。这篇文章,我们把这三个传感器综合起来,制作一个 Arduino 电子钟,通过LCD1602显示年月日、星期以及当前的时间,并可以显示当前的温度和湿度,以下是具体教程。
一、所需材料
Arduino 开发板一块
LCD1602屏幕 一块
DHT11温湿度传感器 一个
DS1302实时时钟模块一个
10K电位计一个
面包板一块
杜邦线若干
二、硬件连接
按照 Arduino使用DS1302读取时间、Arduino使用LCD1602液晶显示屏和Arduino上使用DHT11传感器测量温度和湿度这三篇文章中的连接将Arduino与各模块连接起来。
三、程序开发
程序和所需的库可以在这里下载:
最终实现的代码如下:
//引入依赖
#include <stdio.h>
#include <LiquidCrystal.h>
#include <DS1302.h>
#include <dht11.h>
#define DHT11_PIN 8  //DHT11引脚为8

// 初始化LCD针脚
const int rs = 7, en = 6, d4 = 5, d5 = 4, d6 = 3, d7 = 2;
LiquidCrystal LCD(rs, en, d4, d5, d6, d7);

//初始化DHT传感器
dht11 DHT;

//初始化DS1320针脚
const int kCePin   = 9;  // Chip Enable
const int kIoPin   = 10;  // Input/Output
const int kSclkPin = 11;  // Serial Clock

// Create a DS1302 object.
DS1302 rtc(kCePin, kIoPin, kSclkPin);

String dayAsString(const Time::Day day) {
  switch (day) {
    case Time::kSunday: return "Sun";
    case Time::kMonday: return "Mon";
    case Time::kTuesday: return "Tue";
    case Time::kWednesday: return "Wed";
    case Time::kThursday: return "Thu";
    case Time::kFriday: return "Fri";
    case Time::kSaturday: return "Sat";
  }
  return "(unknown day)";
}

void LCD_display() {
  //显示时间
  printTime();

  //显示空气温度和湿度
  printDht();
}

void printDht() {
    LCD.setCursor(9, 1);
    LCD.print(DHT.temperature);
    LCD.print("C");

    LCD.setCursor(13, 1);
    LCD.print(DHT.humidity);
    LCD.print("%");
}
void loop() {

  int chk;
  chk=DHT.read(DHT11_PIN);
  LCD_display();
  delay(1000);
}

void printTime() {
  // Get the current time and date from the chip.
  Time t = rtc.time();

  // Name the day of the week.
  const String day = dayAsString(t.day);

  // Print  the time to lcd1602.
  LCD.setCursor(0, 1);   //print time;
  if (t.hr < 10) LCD.print("0");
  LCD.print(t.hr);
  LCD.print(":");
  if (t.min < 10) LCD.print("0");
  LCD.print(t.min);
  LCD.print(":");
  if (t.sec < 10) LCD.print("0");
  LCD.print(t.sec);

  LCD.setCursor(1, 0);   //print date;
  LCD.print(t.yr);
  LCD.print("-");
  if (t.mon < 10) LCD.print("0");
  LCD.print(t.mon);
  LCD.print("-");
  if (t.date < 10) LCD.print("0");
  LCD.print(t.date);

  LCD.setCursor(12, 0);   //print week;
  LCD.print(day);
}
void setup() {
  LCD.begin(16, 2); //初始化,设置列行
  LCD.clear();

  // Initialize a new chip by turning off write protection and clearing the
  // clock halt flag. These methods needn't always be called. See the DS1302
  // datasheet for details.
  rtc.writeProtect(false);
  rtc.halt(false);

  // Make a new time object to set the date and time.
  // Sunday, September 22, 2013 at 01:38:50.
  Time t(2020, 2, 4, 20, 50, 00, Time::kMonday);

  // Set the time and date on the chip.
  rtc.time(t);

}
完成后编译下载,就完成啦,效果图如下。

原创文章,转载请注明: 转载自科技爱好者博客
本文链接地址: Arduino使用DS1302和LCD1602制作电子钟 (https://www.tujing.site/3638)
如果博客对您有帮助,请给我 赞助

为什么时间会一直显示2000-00-00